Thursday, October 23, 2014

Thanks a Latte

Hi everyone!  I have a fun coffee card that uses some circle dies along with a companion die - the Lacey circles.  I wanted to frame this adorable latte cup with some layers and bling.
 I added a couple subtle touches of gold with the gold foil washi tape and metallic string.  I love how that simple small circles make the perfect embellishment cluster for the little rose.

Thanks for stopping by and have a great day!  Here is a close up picture.
Card Deets:  
Spellbinders Dies:
S4-293 Lacey Circles, S4-114 Standard Circles LG and S4-116 Standard Circles SM Nestabilities® 
Stamps: Reverse Confetti, Be a Barista  
Other Supplies: Pink,White and Ivory cardstock; Basic Grey "Highline" 6x6 paper pad; Want2Scrap pink circle Nestabling; Gold metallic string; Copics; 1/8" velvet ribbon; Little B gold foil harlequin washi tape; Wild Orchid Crafts 10mm mixed color open rose
Adhesive: Tombow USA Mono Multi liquid glue; Scrapbook Adhesives by 3L Foam Squares 
NOTE: You can also find Spellbinders dies at the The Stamp Simply Ribbon Store.

Photobucket

Sunday, June 22, 2014

Butterfly friend

Hi everyone!  I have a bright summer card to share today.  I haven't had a chance to use the butterfly set, Flutters and I thought it would to perfectly with the happy fun colors of the new Basic Grey Highline paper!!  This was my FAVORITE paper that I saw at CHA in January and couldn't wait for it to be released.
To give the butterfly some sparkle I added a thin layer of stickles on it and as it dried, it helped curl the wings at the tips.
The sentiment die is from the newly released In'spire Line of dies called Celebration Two.  There are 3 everyday phrases in this set and I can see it will be my new go-to set for greetings!
Thanks for stopping by and have a great day!
Card Deets: 
Spellbinder dies: IN-037 Celebration Two and S2-073 Flutters Shapeabilities®, S4-116 Standard Circles SM Nestabilities®

Paper: Bazzill Paper Basics, Butter Mints, Black Licorice and Lollipop Card Shoppe cardstock

Embellishments - Cartwright's Sequins 4, 5 and 6mm satin sequins; The Twinery baker's twine in Pink Sorbet
Adhesive - Tombow USA Mono Multi liquid glue; Scrapbook Adhesives by 3L Foam Squares 
NOTE: You can also find Spellbinders Die Templates at the The Stamp Simply Ribbon Store. 
Photobucket

Friday, May 16, 2014

Be Happy colour suite card


Hi everyone! Welcome to my second post playing along in the May Scrapbook and Cards Today Colour Suite challenge!  For those of you not familiar, this is a color challenge that my friend Summer Fullerton puts together each month for the magazine!
This month the colors are: 2 shades of grey, aqua, yellow and orange/red.  Her color choices were spot on.  I love how on trend the greys are and aqua is one of my go to colors and pairing it with yellow and orange/red just makes me happy!!
Yesterday's card was a simple design and today's is more layered and detailed.
I had lots of fun with this one.  Below you can see how I made the orange frame using Classic Squares nested inside the Classic Scalloped Square.  You can make the frame with 2 steps but to save time, I layered them and did both cuts at once.  Even though the scalloped die lays on top of the square, the cutting edge is tall enough to cut through the cardstock.
Once I adhered the pattern paper to my cardstock, I placed the square die where I wanted my "window" to be.  To make sure everything was straight I used my ruler.  You may notice in the photo I originally had blue paper at the bottom.  It didn't work out and I ended up using the negative pieces of the lattice die adhered in the space.
This is the back side after the square was cut.  I adhered my Fancy Lattice die cut to the back using some washi tape and adhered it to my card base.
 
To read more about this challenge or check out past challenges head on over to the Scrapbook and Cards Today website and Blog.
Thanks for stopping by here is a close up the die cut details.

Card Deets: 
Spellbinder dies:
S4-371 Les Papillions and S5-152 Fancy Lattice Shapeabilities®, S4-128 Classic Squares SM S4-129 Classic Scalloped Squares SM Nestabilities® 
Paper: Bazzill Paper Basics, Marshmallow, Candy Corn, and Robin's Egg Card Shoppe cardstock; Basic Grey, RSVP 6x6 paper pad
Ink: Tsukineko, Versamark 
Embellishments - Stamp Simply Ribbon Store: May Arts - white wrinkled ribbon and silver cord; Fancy Pants - Alpha stickers; Cartwright Sequins - 5 and 6mm sequins; Wild Orchid Crafts - 15mm yellow rose 
Adhesive - Tombow USA Mono Multi liquid glue; Scrapbook Adhesives by 3L Foam Squares   
NOTE: You can also find Spellbinders Die Templates at the The Stamp Simply Ribbon Store.
Photobucket

Wednesday, January 8, 2014

Belly Band gift set tutorial

Hi everyone!  Welcome to Day 4 of the Spellbinders Paper Arts Diamond Anniversary Sneak Peek and Giveaway.  I am excited to show you one of the new die templates being released at the
Winter 2014 Craft and Hobby Association trade show! 
The die set I'm working with today is the S5-212 Belly Band One!

Supply List for Gift Card ensemble:
 S5-212Belly Band One
 S5-185 2013 Snowflake Pendant

Tutorial how I made the belly bands for the bottle and gift card holder:
1.  Trim cardstock to 8 1/2" x 2 1/2"
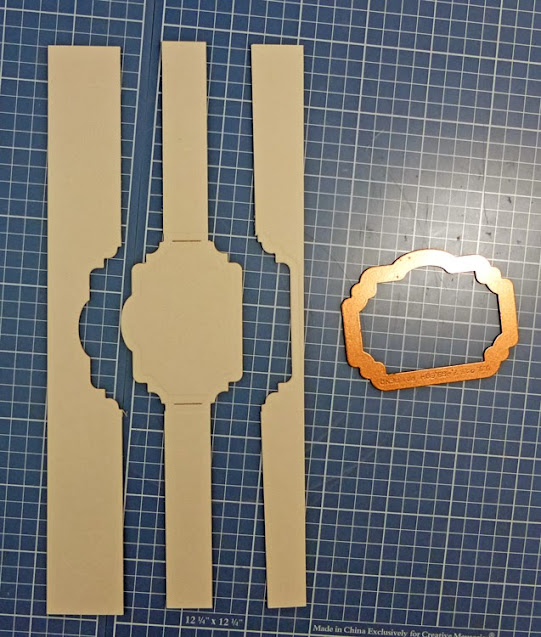
2.  Tape die down with the bottom line of the die parallel to the bottom edge.  For this layer, I used Belly Band Die #2 (with #1 being the smallest).
This is what it will look at once it's cut and embossed.  You'll notice the left and right sides are open ended.  This allows you to trim your "band" any length you want.
3.  To make the band cuts, I put the cardstock in my trimmer and lined it up to the die cut lines.  You could also do this step freehand or even with decorative scissors.
This is what it will look like after all four cuts are made.
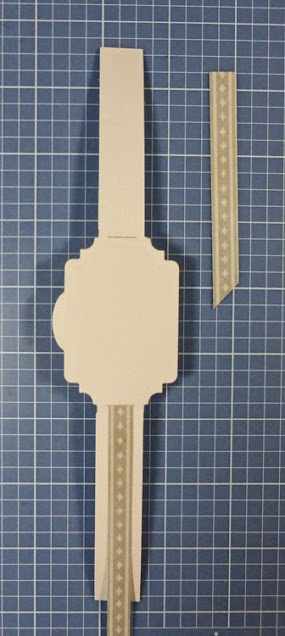
 4.  Next I trimmed 2 pattern paper pieces and slipped them inside the pre-cut openings.  Note, you can also use ribbon as I have shown on my second project below.
5.  Once the accent paper is in place, I taped the ends down in the back.  Then I wrapped the entire band around my bottle/gift card holder, trimmed any excess and glued the ends together.
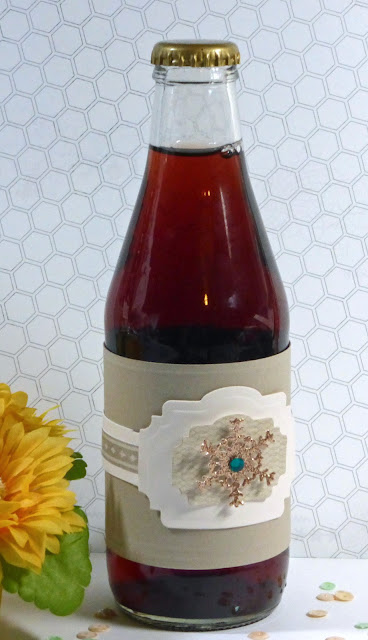
Here's a close up picture of the bottle.  For the second layer, I die cut and embossed pattern paper with Die #1 and turned it into a nesting label shape instead of a band by cutting the sides.


Here's a quick tutorial on how I made the gift cardholder:
1. Trim cardstock 8 3/4" by 4 1/4"
2.  Score lines at the 3" and 6" marks
3. For the diagonal opening, trim off the top right corner.  I made my cut marks 1/2" in from the left at the top and 1" up from the bottom.
4.  Add adhesive along the bottom and up the short side (I used 1/8" Scor-Tape).  This will allow a gift card to fit inside.
 Here's a picture of the ensemble with the belly band slipped off.

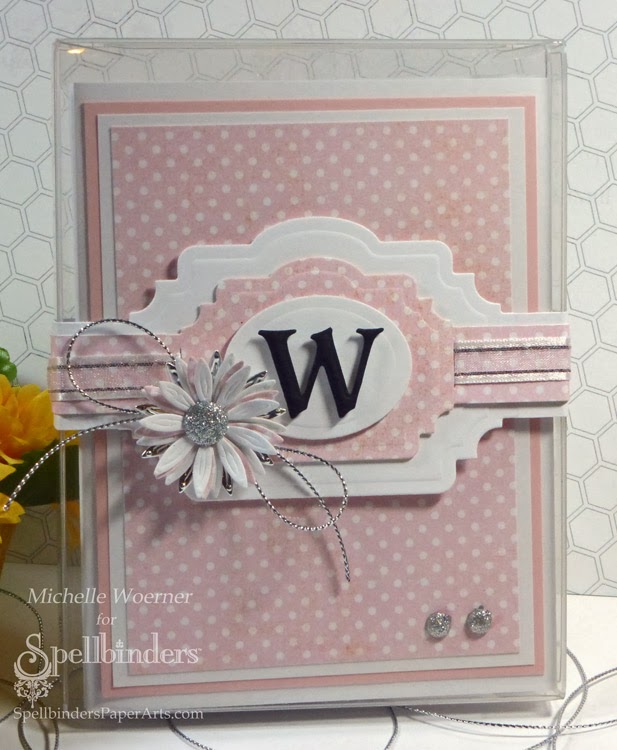
Here is another project I made with the Belly Band One die templates.  I decorated a clear stationery box with two nesting bands with the top layer threaded with ribbon.  I accented the layers with an oval from Classic Ovals SM, a letter from the Font One Uppercase, and flowers from the Blooms Four set.
Thank you for stopping by and have a great day!

Friday, January 3, 2014

Some more Christmas thank yous

Click here for my Season's Givings blog post.

Hi everyone!  I have a couple more Christmas thank you cards to share. These cards are really easy to make.  I just cut my pattern paper scraps into 1" wide stripes and die cut snowflakes from glitter cardstock.  Snowflakes are my absolute favorite shape for the holiday season and my card uses the 2013 Snowflake Pendant dies.  Each year Spellbinders comes out with a special snowflake pendant die set and this year's is GORGEOUS!
I love glitter cardstock, it makes such a high impact with no extra work.  The paper is thicker and "gummier" than regular cardstock, but it still die cuts very well, just run it though 2 times and emboss it.
Here's my first card with red and white glitter snowflakes.
Here it is with champagne and white glitter snowflakes.
Thanks for stopping by and have a great day!

Card Deets:
Spellbinder dies: S5-185 2013 Snowflake Pendant Shapeabilities ®  
Stamps: JustRite Papercrafts, Grand Sentiments stamp set
Cardstock: Bazzill Paper Basics, Butter Mints card shoppe; Best Creation glitter cardstock in red, champagne and white
Ink: Tsukineko, Versafine Onyx Black
Pattern paper - Basic Grey, 25th and Pine 6x6 paper pad 
Embellishments - Want2Scrap rhinestones and pearls
Adhesive - Tombow USA Mono Multi liquid glue; Scrapbook Adhesives by 3L 3D Foam Tabs


You can also purchase these dies at The Stamp Simply Ribbon Store
Photobucket

Monday, September 9, 2013

Happy Birthday card

Hi everyone!  I have a fun birthday card to share using some of the new Spellbinder dies.  I featured the new Cut/Fold/Tuck dies, Fascination to make the flowers and added roses from Bitty Blossoms in the center.  The sentiment is the Sentiments set sponged with pink ink.
 You can see step out pictures on how I used the letterpress technique with the sentiments dies and made the C/F/T flowers on this blog post.

Thanks for stopping by and have a great day!  Here is a close up picture.
 
Card Deets:
Spellbinder dies -S5-200 Sentiments; S5-206 Fascination; S5-168 On The Edge; S5-086 Bitty Blossoms
Pattern paper - Basic Grey Knee Highs 6x6 pad
Cardstock -Bazzill Paper Basics Marshmallow card shoppe
Ink - Tsukineko Versamark and Plumeria
Adhesive - Tombow USA Mono Multi liquid glue
Embellishments - Kaisercraft hot pink rhinestones; glitter embossing powder

You can purchase these dies at The Stamp Simply Ribbon Store.  They offer a wide variety of supplies for all your papercrafting needs including Spellbinders dies, ribbons of all textures, styles and thicknesses, beautiful papers and lots of fabulous embellishments!

Photobucket

Saturday, June 8, 2013

Smile with wood veneers

Hi everyone!  I have a couple fun happy cards using some of the wood veneers I've been holding on to forever!
This card uses a wood flower veneer from Prima, and you can find the same ones under the Recollections brand at Michaels.  I used the Hearts One die, Charmed I'm Sure and A2 Curved Borders One dies from Spellbinders.  Pattern paper is from Basic Grey, Kneehighs.  This card really makes me smile!
 This one uses alpha and heart veneers from Studio Calico along with 2 of my favorite flower die sets, Jewel Flower and Flourishes and Rose Creations.  The pattern paper is Echo Park, This and That Graceful.
I'll keep it short and sweet today.  We finally have some sunshine and my garden is calling me!!  Thanks for stopping by, here are some close up pictures.
Spellbinder dies and all ribbons can be found at the Stamp Simply Ribbon Store.
Ribbons: White wrinkled, teal pleated and 1/8" gray velvet ribbon
 Photobucket

Tuesday, October 11, 2011

Swimming For Katie


Hi Everyone!!  Welcome to Day 3 of the Swimming for Katie blog hop.  From October 10-12th some of the best stampers are joining together to support and encourage our friend and fellow stamper, Katie Renz, who is currently battling inoperable gastric cancer.  If you're not familiar with her, Katie’s cancer story started just before Christmas last year.  This young, beautiful, healthy, vibrant mother of 3 with her infectious smile was suddenly diagnosed with an inoperable cancer, virtually overnight.  A few tummy aches and then stage 4 gastric cancer.  Her first post about it is HERE.  The idea of “Swimming for Katie” came from her recent post HERE.

Here is my card.  I colored the image with copics and added a bit of stickles here and there for sparkle! 

This exclusive stamp used in my sample, designed by Becky Oehlers is available as a clear stamp, as well as a digis or a dig and SVG cut file.  In addition to the Keep Swimming Octopus, Marianne Walker and True =D Doodle Designs both also donated digis that are for sale.  
Click HERE for all the items available for sale

Direct donations are also being accepted.


100% of the profits go to Katie's fund to help her and her young family.  Her husband Kevin and her three young children need our help and support. 

IN ADDITION:
To help raise money for Katie, Creating for Causes has generously donated a FREE ticket (value: $249.95) to one of their upcoming 3-day Scrap & Stamp Retreats.

The winner of the free ticket will enjoy 3 days of non-stop fun and creativity with fellow scrappers, stampers and paper crafters, and can choose between the Charlotte, NC Scrap & Stamp Ritzy Retreat at The Ritz-Carlton on October 21-23 or the Orlando, FL Scrap & Stamp Retreat at the Marriott World Center on November 4-6. Both retreats promise to spoil you and provide 48-straight hours of creating, camaraderie and fun!

To learn more about the events, please visit: http://www.creatingforcauses.org/our-events/scrapbook-events/.

Here's how it works:
 Simply make a $33 donation (or more) for Katie and indicate that you want to be entered in the Creating for Causes Retreat ticket drawing. Everyone who makes a qualifying donation will be entered into the drawing and one lucky person will be attending this 3-day retreat for FREE! That lucky person could just be you!  (If you have already donated and wish to be included, just email kate(at) iheartpapers (dot) com)

DEADLINE TO ENTER FOR THIS GIVEAWAY IS FRIDAY 9PM EST, although other donations will be accepted for weeks to come.

The following is a list of everyone who has projects posted today.  I hope you will be inspired by them and moved to purchase or donate.   

If you would like to send Katie a card, her mailing address is:
Katie Renz
PO Box 5913
Bellingham, WA 98227-5913

Thursday, March 17, 2011

You're invited...

Hi everyone!  I have 2 fun invitations for you today.  The FIRST, tonight is the Gina K. Designs March Release party!!  WAIT A MINUTE... you might be thinking, "Hey, did I miss all the sneak peeks?"  Well... no you haven't!  Gina switched things up this month.  We are doing the release party FIRST and then, starting tomorrow, we will have a 4 day DT blog hop showcasing the stamps.

Party details can be found on the StampTV Home page.  The festivities start at 7pm (Central).  It will be FAST moving with set reveals and DT samples going up every 10 minutes or so!  

Here is a little sneak peek of a card I made using the new March Stamp TV Kit, Springtime Silhouettes: 
______________________________________________________________

And now for my SECOND invitation - Sharon has launched her NEW and IMPROVED online store:
Oh this is such a fun day!  Now you can order all your favorite goodies with a click of a button, no more emailing for an invoice.  This took a lot of time and work, so please take a look around and let Sharon know what you think!!

In celebration, I have a card to share (OK, ignore that it's actually a sympathy card, oops).  This card uses the Rose Border set by Wordsworth, the pattern paper is from the Basic Grey, Curio 6x6 pad and the ribbon is the 1/2" wrinkled ribbon in Burgundy.
Thank you for stopping by and I look forward to chatting with you all tonight at the release party!!
Photobucket

Wednesday, January 26, 2011

Baby boy

Hi everyone!  I am preparing to leave for CHA, so this blog post will be short.  My card today uses the cutie new Verve set, To the Moon.  I absolutely LOVE the whimsical Verve-y style to this baby set.  Seriously, an instant FAVORITE of mine! 
I totally fell in love with how Amy made the elephant hanging out of the window and had to do the same thing with this card!  The strip of horizontal stars is actually made from an accent stamp of 3 stars.  I added a small silver pearl to the larger stars.  Happy sigh...

The sketch is last week's Card Pattern's sketch 98.  Yeah, a week late -that's how I roll lately.  lol!

I leave for CHA Friday morning and won't be home until late Tuesday, so things will be quiet around here.  There will be one pre-posted special blog hop on Feb 1st, so keep an eye out for that.  Thanks for stopping by!
Card Deets:
Stamps - To the Moon
Ink - Memento Tuxedo Black
Cardstock - Pure Luxury White
Pattern Paper -Marjoriane 6x6 pad (Basic Grey)
Accessories - scallop trim and word window punch (SU!), square nesties (Spellbinders), silver pearls Reflections for Michael's, copic markers, silver cord

Photobucket

Friday, December 10, 2010

SSNOTIME #169 - Quick and Easy Gift Sets

Hi everyone!  Most of you are familiar with Sharon's weekly Stamp Simply challenge?  Well, last week she announced some changes to her weekly challenge and now us gals on the DT for her store will be playing in the challenges! 

This week the challenge is to make Quick and Easy Card Gift Sets!

Who doesn't love to receive a gift set of cards all neatly packaged up?  The team was challenged show you samples of some quick, easy, but still FAB cards in coordinated sets presented in a Clear Box for a real WOW factor!  Tie on a bow, add a belly band -- whatever strikes your fancy! 

I started out by making a quick and easy Christmas card and then used THE SAME layout to make a trio of birthday cards.  You know as stampers, we like to make all kinds of cool "go where life takes you" kind of cards, but let's face it, when friends and family ask for cards -they are always BIRTHDAY!  Aren't they?!? 

Here is the Christmas card.  The cutie Christmas paper is by KaiserCraft, Be Merry, sentiment from JustRite Stampers, Christmas Nested Frames, silver cord and rhinestones and a poinsettia prima to top it off!

Each of the birthday cards uses the same layout, I just changed the flower accent and pattern paper.  The birthday sentiment is from Clearly Wordsworth, Everyday Greetings.  This card uses Basic Grey, Curio, Prima Fairytale rose in Coral, 1/8" silk ribbon and rhinestones.

This one uses Basic Grey, Marjolaine, Prima Trellis Rose in Fontaine, silver cord and rhinestones.

This one uses Cosmo Cricket, DeLovely, Prima Trellis Rose in Fontaine, silver cord and rhinestones.

Here is the pic of them all packaged in a clear box!  You can dress these up as elaborate or simple as you want.  If sending to a crafter, I use all kinds of ribbons and flowers, but to a non-crafter (where the packaging will likely end up in the trash) I go with some simple silver elastic cord.  The poinsettia flower matches the Christmas card.

I have to admit, the prima flowers I used on these cards are REALLY poofy!  Here is a side view of them stuffed in the box.  It bulges a bit, but who cares?  lol!
Everyone is welcome and invited to play along!  For those uploading on SCS, the keyword is ssnotime169.  There is no time limit. You can play this challenge anytime at all.  The point is to keep it simple, quick and have fun!!!  And when posting to your blog, be sure to link up to Mr. Linky at the end of this post. Please link the direct post, not your blog URL, so we can easily find your project!

This week Deb and Barb are also playing along this week.  Be sure to check out their blogs to see what gift set they created!!
Deb Saaranen:  Dream in Color 
Barb Schram:  Explore.  Dream.  Discover (will post on Saturday)

All items in bold/italic are available from The Stamp Simply Ribbon Store.

To order just email Sharon at ssj@up.net with your list and your state/zip OR country so she can calculate postage and she will get back to you with an invoice. 
You can see all KITS here.
You can view all ribbons available here.
You can view individual paper pads, supplies and JustRite stamps here.
You can view the Just Rite Cling stamps in stock here.  This link also includes some super sell-out prices of many JustRite sizes she will no longer restock.
You can view all tools used here.
You can view Odds-N-Ends for sale here.
You can see/read about the CLEAR BOXES here and here.
You can view Verve stamps here.
You can view Wordsworth stamps here.
You can view Primas here.

Thanks for stopping by and have a great day!

I have added this set of 3 birthday cards to my Etsy store if anyone is interested.

Photobucket