Sunday, November 20, 2022

Bloom Sprigs card set

Hi everyone! Today I'm sharing a set of 5 cards featuring the new Postage Edge Rectangles die set and a couple of the Sprig dies from the Sealed by Spellbinders wax seals collection.
Every year I give out card sets for Christmas to a few family members who I know send out cards. I love to find a simple layout and changed up the colors and sentiments and kept everything else the same. Here's the set I made.

Products used on these cards:
Copic markers
variety of twine and gems
Sentiments: Yana's Special Sentiments Glimmer, Yana's Tiny Sentiments Glimmer, GKD Sentiment Sheets Mixed Messages
Here are closer photos of each card.

Designer tip:
It can be challenging to wrap twine around a front panel and have it lay flat on the card. I generally "pop" up my image panel in some way, so I wrapped my twine and then adhered 3 more die cut panels with the place for the twine cut out. Here is a visual.
Thanks for stopping by and have a great day!

The products linked throughout my post are my personal affiliate links which you can shop from at no cost to you!  Thank you for supporting me!

Tuesday, December 19, 2017

Peppermint bark popcorn treat gifts

Hi everyone! First, I want to wish you all a very merry Christmas and let you all know much I appreciate you following my blog!! Thank you.
So, every year I make a double batch of Peppermint Bark Popcorn and give it out to all my neighbors. In looking at the date I printed out the recipe, it looks like I've been doing this since 2008! Wow, time has flown by! I love this tradition.

So this year it dawned on me, WHY NOT USE OUR POPCORN BOX DIE? I mean really? Why hadn't I thought of this before? Duh! LOL! So this year I busted it out and went to work.

I used a lots of little goodies to tie up and decorate my boxes and tags. Too many too mention, but the main things are the Popcorn Box Steel Rule die, Poinsettia Steel Rule die and the Tag Time punch So here's what I came up with so far. I've made 2 boxes and I have 8 more to go!! 

Like many of you, I have a condition called Can Never Make The Same Thing Twice-itus, so all my tags, ribbons and popcorn boxes are and will be different. Here is the first style:
Second Style:

...and here is what I have left to do. Wish me luck!
Thanks for stopping by and once again I wish you and yours a very merry Christmas!

All supplies used are Fun Stampers Journey.

Thursday, July 20, 2017

Introducing some new flower and branch dies

Hi everyone!  Yesterday I had a chance to play around with several of FSJ's new flower and branch dies and made a small note card set for my sister.  If you've followed me for any amount of time it's no secret I LOVE anything flowers!  So it's no surprise with the new catalog product launch, I gravitated to these first.
My set of three cards all use the same basic layout, satin ribbon layered with organdy, the Love Stripes embossing folder and sentiments from the Hostess Exclusive set called Family Forever.

My first card uses the amazing branch die called Detailed Foliage die cut from Silver Mirror cardstock (which is new and a FAV of mine).  I paired it with the large flower from the Bloom Benefits Victorian Accent pack and River Stone satin ribbon.
My second card uses the Bloom Creator die set with the Hostess Exclusive die Mystic Vine.  I alternated the blooms and branches with Cool Pool, Vellum and Silver Mirror cardstock.
My last card uses the Star Burst Bloom die set.  Just one word for you, LOVE.  I made this one using Lavender Fusion and Silver Mirror.  I kept the bloom without a branch behind is as I thought the layering pieces in this set stood alone.
Thanks for stopping by and have a great day!
All products used are Fun Stampers Journey.

Wednesday, January 8, 2014

Belly Band gift set tutorial

Hi everyone!  Welcome to Day 4 of the Spellbinders Paper Arts Diamond Anniversary Sneak Peek and Giveaway.  I am excited to show you one of the new die templates being released at the
Winter 2014 Craft and Hobby Association trade show! 
The die set I'm working with today is the S5-212 Belly Band One!

Supply List for Gift Card ensemble:
 S5-212Belly Band One
 S5-185 2013 Snowflake Pendant

Tutorial how I made the belly bands for the bottle and gift card holder:
1.  Trim cardstock to 8 1/2" x 2 1/2"
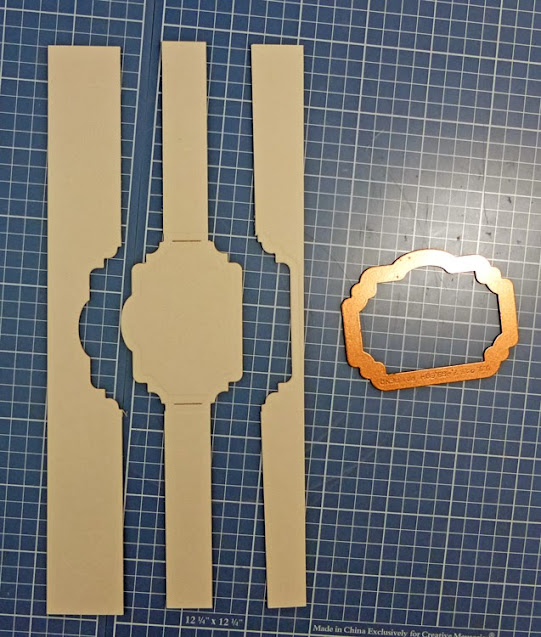
2.  Tape die down with the bottom line of the die parallel to the bottom edge.  For this layer, I used Belly Band Die #2 (with #1 being the smallest).
This is what it will look at once it's cut and embossed.  You'll notice the left and right sides are open ended.  This allows you to trim your "band" any length you want.
3.  To make the band cuts, I put the cardstock in my trimmer and lined it up to the die cut lines.  You could also do this step freehand or even with decorative scissors.
This is what it will look like after all four cuts are made.
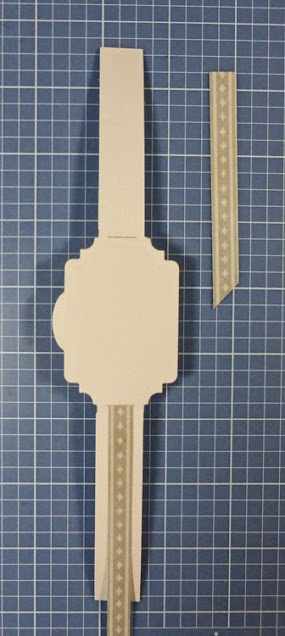
 4.  Next I trimmed 2 pattern paper pieces and slipped them inside the pre-cut openings.  Note, you can also use ribbon as I have shown on my second project below.
5.  Once the accent paper is in place, I taped the ends down in the back.  Then I wrapped the entire band around my bottle/gift card holder, trimmed any excess and glued the ends together.
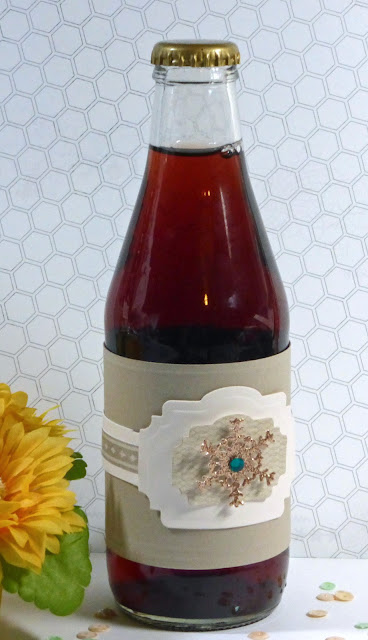
Here's a close up picture of the bottle.  For the second layer, I die cut and embossed pattern paper with Die #1 and turned it into a nesting label shape instead of a band by cutting the sides.


Here's a quick tutorial on how I made the gift cardholder:
1. Trim cardstock 8 3/4" by 4 1/4"
2.  Score lines at the 3" and 6" marks
3. For the diagonal opening, trim off the top right corner.  I made my cut marks 1/2" in from the left at the top and 1" up from the bottom.
4.  Add adhesive along the bottom and up the short side (I used 1/8" Scor-Tape).  This will allow a gift card to fit inside.
 Here's a picture of the ensemble with the belly band slipped off.

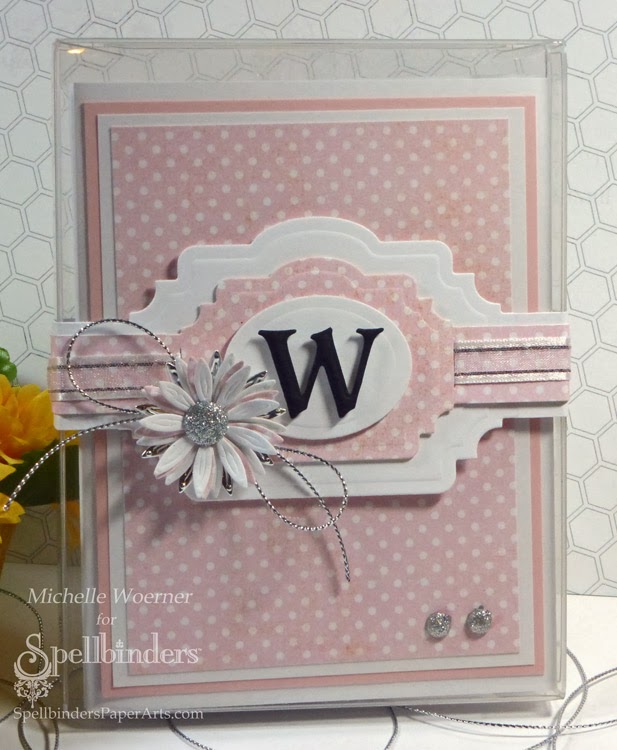
Here is another project I made with the Belly Band One die templates.  I decorated a clear stationery box with two nesting bands with the top layer threaded with ribbon.  I accented the layers with an oval from Classic Ovals SM, a letter from the Font One Uppercase, and flowers from the Blooms Four set.
Thank you for stopping by and have a great day!

Friday, December 10, 2010

SSNOTIME #169 - Quick and Easy Gift Sets

Hi everyone!  Most of you are familiar with Sharon's weekly Stamp Simply challenge?  Well, last week she announced some changes to her weekly challenge and now us gals on the DT for her store will be playing in the challenges! 

This week the challenge is to make Quick and Easy Card Gift Sets!

Who doesn't love to receive a gift set of cards all neatly packaged up?  The team was challenged show you samples of some quick, easy, but still FAB cards in coordinated sets presented in a Clear Box for a real WOW factor!  Tie on a bow, add a belly band -- whatever strikes your fancy! 

I started out by making a quick and easy Christmas card and then used THE SAME layout to make a trio of birthday cards.  You know as stampers, we like to make all kinds of cool "go where life takes you" kind of cards, but let's face it, when friends and family ask for cards -they are always BIRTHDAY!  Aren't they?!? 

Here is the Christmas card.  The cutie Christmas paper is by KaiserCraft, Be Merry, sentiment from JustRite Stampers, Christmas Nested Frames, silver cord and rhinestones and a poinsettia prima to top it off!

Each of the birthday cards uses the same layout, I just changed the flower accent and pattern paper.  The birthday sentiment is from Clearly Wordsworth, Everyday Greetings.  This card uses Basic Grey, Curio, Prima Fairytale rose in Coral, 1/8" silk ribbon and rhinestones.

This one uses Basic Grey, Marjolaine, Prima Trellis Rose in Fontaine, silver cord and rhinestones.

This one uses Cosmo Cricket, DeLovely, Prima Trellis Rose in Fontaine, silver cord and rhinestones.

Here is the pic of them all packaged in a clear box!  You can dress these up as elaborate or simple as you want.  If sending to a crafter, I use all kinds of ribbons and flowers, but to a non-crafter (where the packaging will likely end up in the trash) I go with some simple silver elastic cord.  The poinsettia flower matches the Christmas card.

I have to admit, the prima flowers I used on these cards are REALLY poofy!  Here is a side view of them stuffed in the box.  It bulges a bit, but who cares?  lol!
Everyone is welcome and invited to play along!  For those uploading on SCS, the keyword is ssnotime169.  There is no time limit. You can play this challenge anytime at all.  The point is to keep it simple, quick and have fun!!!  And when posting to your blog, be sure to link up to Mr. Linky at the end of this post. Please link the direct post, not your blog URL, so we can easily find your project!

This week Deb and Barb are also playing along this week.  Be sure to check out their blogs to see what gift set they created!!
Deb Saaranen:  Dream in Color 
Barb Schram:  Explore.  Dream.  Discover (will post on Saturday)

All items in bold/italic are available from The Stamp Simply Ribbon Store.

To order just email Sharon at ssj@up.net with your list and your state/zip OR country so she can calculate postage and she will get back to you with an invoice. 
You can see all KITS here.
You can view all ribbons available here.
You can view individual paper pads, supplies and JustRite stamps here.
You can view the Just Rite Cling stamps in stock here.  This link also includes some super sell-out prices of many JustRite sizes she will no longer restock.
You can view all tools used here.
You can view Odds-N-Ends for sale here.
You can see/read about the CLEAR BOXES here and here.
You can view Verve stamps here.
You can view Wordsworth stamps here.
You can view Primas here.

Thanks for stopping by and have a great day!

I have added this set of 3 birthday cards to my Etsy store if anyone is interested.

Photobucket