Thursday, June 5, 2025
Pretty Pink Posh June 2025 Release, You Are Spe-shell
Thursday, June 13, 2024
Spellbinders: Sealed 3D Botanical collection
Sunday, May 7, 2023
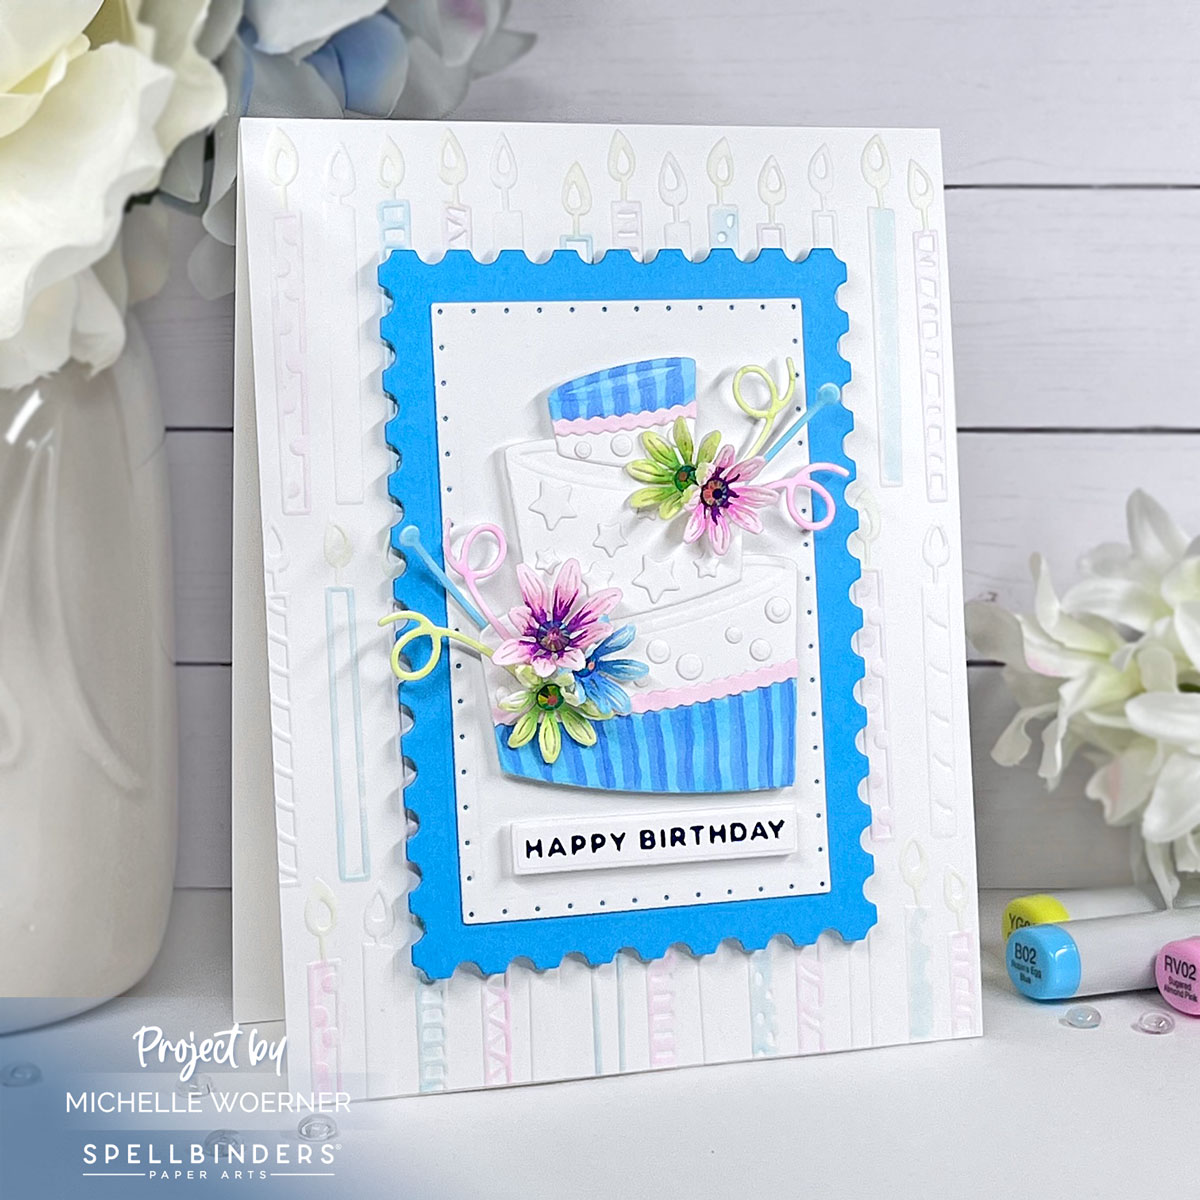
Spellbinders | May 2023 Embossing folder, Topsy Turvy cake card
Hi everyone! I have a fun card to share today. This one uses the Spellbinders May Embossing Folder of the Month called Candles for Every Birthday. This folder is a repeated pattern of birthday candles and is pretty cute. Check out what I made.
Thanks for stopping by and have a great day!
Tuesday, May 2, 2023
Gina K Designs | May 2023 release Birds and Magnolias
Hi everyone! Tonight is Gina K Design's May release and I'm excited to share a card using the Birds and Magnolias stamp and die sets. This set is designed by Hanna and features 2 beautiful birds on magnolia branches, several loose magnolia blooms and several sentiments. I really love this set!
Be sure to check out the What's New section to see ALL the fabulous stamp and die sets released, including a new bundle called Create Friendship!!
Friday, March 24, 2023
Stenciled background card ideas
Hi everyone! I am playing around with stencils for an online stencil class I am taking and here are a couple cards I've made with the backgrounds.
First up is a simple stenciled background using the Twinkle stencil by Spellbinders. I used 3 colors and when they over lap each other you end up with 5 colors. I used a pink, blue and green -I blended the pink at the top, blue in the center and green along the bottom. When they mix with each other there is a gorgeous purple and teal color that appears.
 Next up is a pretty background make with the Gina K Designs stencil called Snowflake Mandala. Once again I used 3 colors of ink -teal, yellow and pink. After I stenciled the colors, I used a thin layer of gel medium mixed with Sparkle Dust glitter. The gel is almost clear, so the ink shows through only slightly muted. The result is so pretty!
Wednesday, February 15, 2023
Sweet Day Flowers colored two ways
Hi everyone! There's a Spellbinders Instagram hop going on now that showcases the Four Petal Collection and I'm excited to be part of it! If you have IG, head on over to my post and I give all the details including some prizes and the hop order full of inspiration!
It's been a minute since I did some coloring, so I was inspired to color the beautiful Four Petals Sweet Day Flowers stamp set flower cluster in 2 ways! I used my go-to Copics for one version and then pulled out my much neglected Karin markers for the other. Check out what I made.
Funny story and hope you all can relate. When I was photographing the cards, I planned on staging each with the coloring markers that I used. Well, I must have been distracted or something, but I GOT THEM SWITCHED! Oy. So when you look at the cards, they are actually colored with the other medium. I can't believe I didn't notice it until the hop went live. So rather than retaking the photos and fixing it, I am sharing them all kinds of wrong and all! lol!
Here is the Copic Marker colored version:
Here is the Karin marker version colored on heat embossed image:
Sunday, September 4, 2022
Spellbinders Poinsettia 3D embossing folder
Hi everyone! Today I'm sharing a card I made using the new Scenic Poinsettias 3D embossing folder from Spellbinders. I LOVE poinsettias. They are right up there with snowmen for my favorite Christmas decor and using on cards. This month, Spellbinders came out with a 3D folder with poinsettias and I think it may be my favorite embossing folder ever. Check it out.
There are so many possibilities with this folder, but for my first card I decided to color in the design with copic markers. STUNNING. Sadly, in photos it's hard to see all the gorgeous embossed details, so I took a few photos and I hope the details comes through.
I didn't want a sentiment to detract from the gorgeous pattern and my coloring, so I adhered the sentiment and a small bit of holly berries and leaves from the Holiday Label Motifs die set on to vellum. I added a few of the Red Mix essential gems for a bit of sparkle. I die cut my panels with the A-2 Matting Basics A and B die sets.
Monday, May 30, 2022
Glimmering Peony friend card
Hi everyone! This is my first time coloring a foiled image and through a bit of trial and error, I discovered Hammermill (my cardstock of choice to foil on) is copic friendly (Zig markers, not so much)!!
Monday, February 28, 2022
Gina K Designs February release
For my second card, I colored the branch and blossoms with my Zig Real brush markers. I don't use them enough and they are so quick and easy to use. To make the cards coordinate, I used the same background stamp and ink to make the backdrop.
Monday, January 24, 2022
Gina K Designs January release
Hi everyone! Tonight is the January release for Gina K Designs and I am SO EXCITED to share a few projects using the 2 new sets - Love Hearts and Sealed with a Kiss. There are many other fabulous stamp and die sets in this release, so be sure to check them all out!!
First
up I have a couple cards using the Love Hearts stamp set stamp and Love Hearts die set. This
is designed by Beth Silaika and has 9 heart patterns, a heart border and trio and 9 sentiments! So cute and versatile. This first card is pretty simple, for the bottom half I scored a piece of Cherry Red cardstock every 1/4" and added a piece of ribbon and some gold cord. I stamped the sentiment and 3 hearts in Cherry Red and added some gold gem accents.
Sunday, October 31, 2021
Merry Christmas Cardinal
Hi everyone! Today I'm sharing a Christmas card using the newly released set from Stamp Simply Clear Stamps called, God Will Take Care of You. I combined the beautiful cardinal image with a sentiment from the set, Jesus.
I created the wreath the cardinal sits in by die cutting several circle rings from white, green and gold mirror cardstock. At the bottom I added sprigs from the same papers die cut from the Two Sprigs die set. I added a double bow from some 1/4" silk ribbon in red using the Bow Easy template.
Thanks for stopping by and have a great day!
Other supplies: Quilted Card Front die by Concord and 9th, Flat back gold gems, Copic markers
Monday, October 25, 2021
Stamp Simply Poinsettia card
Hi everyone! I've had quite a challenging last week, so I am behind in posting some of the projects I've made. Here is a Christmas card using Stamp Simply Clear Stamps Floral Cluster Winter Poinsettia set. It's one of my favorite Christmas sets they have!
 I colored the poinsettia with copics and used a few die cut frames I had in my stash for the background. The poinsettia in the bottom corner is fussy cut from the larger one. With all the layers, you can get 3 sizes of flowers with some fussy cutting!
 Thanks for stopping by and have a great day!
Other supplies: Sentiment from Jesus stamp set by Stamp Simply Clear Stamps, Copic markers, Gold pearls, discontinued frames die set, Nested Scalloped Stitched Rectangles by Gina Marie Designs
Wednesday, August 18, 2021
Starting on Fall cards!
Hi everyone! OK many of you crafters have already started on your fall projects even on to Christmas! But over here in the Woerner household we're preparing for our summer vacation and school doesn't start until September 9th! All of which is to say, I want to savor every day of summer and I try to hold off on Fall projects as long as I can. But these new fall stamp sets are the cutest and I had to dive in!
First up is a card using the adorable Sweet 'n Sassy set called Fall Breeze. This is my first purchase to Sweet 'n Sassy and it won't be my last because they announced a collaboration with one of my FAVORITE stamp designers, Julee Tillman (yes, Julee of Verve!). This set was illustrated by Julee and is under the new name of J Tillman Designs. So happy for Julee and excited to see more stamp sets!
I went old school with this one and used some Scalloped Circle dies from Spellbinders and a small piece of burlap that I got at the Dollar Tree. Adds the perfect amount of fall texture don't you think? I colored the pumpkin with copics and added a bit of Sakura sparkle gel pen to the star and trails.
Next up is from the new fall stamp set from Gina K. This one is called Absolutely Autumn. I mean aren't those leaves adorable?!? I made it a mini slimline card using dies from Gina's Master Layouts 7 die set. I kinda like the mini slimline size and I love how they fit into a regular business envelope that you can find at the Dollar Tree or any office supply store!
I colored the leaves with my Zig markers and matched them to the small piece of patterned paper.
Thanks for stopping by and have a great day! Here are a couple close up photos.
Wednesday, August 11, 2021
Copic colored Caring Flowers
Hi everyone! When I saw this gorgeous floral spray image from the Caring Flowers stamp set by Gina K Designs, I just had to have it! It is stunning and the sentiments in this set are unique and meaningful. I have been seeing gorgeous blue flowers all over Pinterest, so I went with the inspiration and used blue hues to color these. I added touches of white gel pen to the centers for a crisp contrast.
I kept in the blue tone family and colored the accent flowers with a purple combination. I just love how this turned out and I can see it colored in a million other ways.
The cover plate die I used is part of Pink Fresh Studio's Essentials line, Diagonal Stitched Rectangles. I pretty much use it on every card!
The gems were purchased in bulk from Etsy and here is a pic of me sorting them by color family, cause a girl's gotta do what a girl's gotta do! Now they are all neatly organized and easy to sort through for every project.
Wednesday, July 28, 2021
Simple CAS card, watercolored roses and a bonus tip for hand drawn frames!
Hi everyone! Today I'm sharing another card using the newly released Always Delightful stamp set from Gina K. This one is super CAS with some light copic coloring and a hand drawn frame. I got a few questions about how I made the frame, I used the Sakura Pigma Micron 05 pen in black (this is also copic friendly) and a ruler. Easy peasy!
One tip I have when using a ruler to make lines, wipe the ruler with a baby wipe (or damp paper towel) after each line. The ink from the pen can transfer to the ruler and you can accidentally mark up your cardstock when moving it around.
Next up is a lovely rose image from Gina K's Peaceful Rose mini stamp set. I love these roses because they are a perfect blend of realistic and whimsy.
I colored these beauties with my MeiLiang Watercolor paint set (from Amazon). And the woodgrain paper is from the Wood Texture 6x6 pad from Craft Consortium and is a MUST have! There are patterns in a variety of colors and patterns, you can find something for any project!
Thanks for stopping by and have a great day! Here are a few close up pictures.


