Thursday, July 12, 2018

Color burst pencil combos to match new FSJ colors

Hi everyone! I mentioned yesterday that I was working on pencil color combinations for our 6 new colors. Well, I figured them out and think they are a pretty close match. These color combos are for the Color Burst Pencils. I imagine they would be similar with the Color Splash pencils, but I have not tested those.  Before I get to the colors, I want to share a few tips I came up with while I was tinkering around.

Tips for blending multiple colors: 
1. When you lay down the color, try to lay it evenly without sharp lines. Sharp lines can be hard to blend. Try "dulling" the tip of the pencil on a scratch paper to minimize sharp lines.

2. If you DO end up with some thick or sharper lines, take a white eraser to them to lighten them up and start again. Try to get the color even before you add your next color.

3. If you like to blend your pencil colors using stumps with baby oil or Gamsol, keep in mind the last color laid down will be the first to come up with blending. After you blend, go ahead and add another layer of whatever color you added last.

4. The order of the pencil colors do matter. But for fun try switching them up, you will get different hues and be used when making shadowing/shading your images.

Disclaimer: I am not a professional colorer (is there such a thing? lol). I know many of my readers are way more experienced in coloring, so I would love it if you have additional tips to share! Leave me a comment below for all to see.

--Chambray Shirt--
--Rustic Rose--
--Haystack--
--Fresh Sage--
--Tin Pail--
--Peaches and Cream--
Thanks for stopping by! I hope this was helpful.

Wednesday, July 11, 2018

FSJ Catalog Launch Party

Hi everyone! We've been celebrating our new 2018-2018 Catalog with a fun Launch Party!! You can view the entire catalog online HERE.  All week there have been blog post inspiration and Instagram giveaways. Be sure to follow FSJ on Instagram for details on our new giveaway. You can win an FSJ gift card!

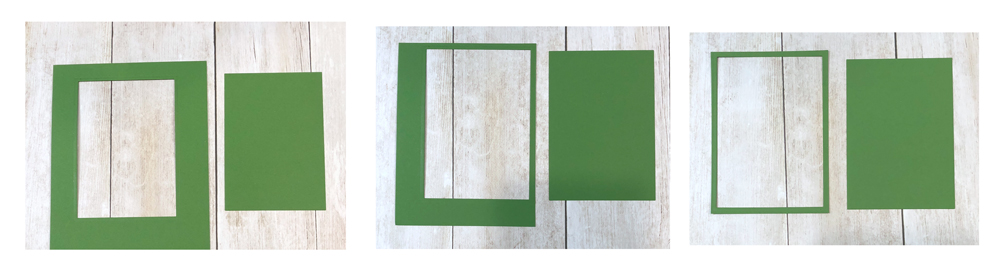
It was sooooo hard to chose what my very first card would be out of all the new amazing goodness! I ended up picking one of the new Blooms sets called Handpicked For You. I love everything about this set- the images, sentiments and the little tag! I colored it with the Color burst Pencils and framed it with a Kiwi Slice frame. To make the frame that thin, I die cut a rectangle and then used the outside/negative piece and trimmed a small frame from that (see below). Using this technique you can control the thickness of the frame.
The sentiments were heat embossed with white embossing powder. I love the way that makes it pop. The patterned paper is from the new RSVP Prints collection. Peeking out from underneath the paper panels is our new Rustic Rose satin ribbon. Oh yes, we launched NEW ribbons -5 of them!

Here's 2 easy steps how I made the frame using 1 rectangle die:
STEP 1: Die cut rectangle making sure to leave enough cardstock on all sides for your frame.
STEP 2: Make 4 cuts trimming the cardstock on all sides leaving your frame.

Thanks for stopping by! Here's a close up picture. I'm working on the pencil combinations for all 6 of our new colors. The combination I used to get the Rustic Rose color is: 29+5+9 in that order. Stay tuned for a blog post tutorial for all 6 and some tips.

All products used are Fun Stampers Journey. A reminder you need to order FSJ products through a Journey Coach. I am not a Coach. You can find a coach near you on the FSJ website in their Find A Coach tab.