
Hi everyone! Welcome to Day 3 of the Spellbinders Paper Arts Springtime Shipping Frenzy. I am excited to show you two of the new Die D-Lites templates that were previewed January and are available and shipping out now!
To celebrate I’ve created a couple of cards to give you some ideas on how to use them.
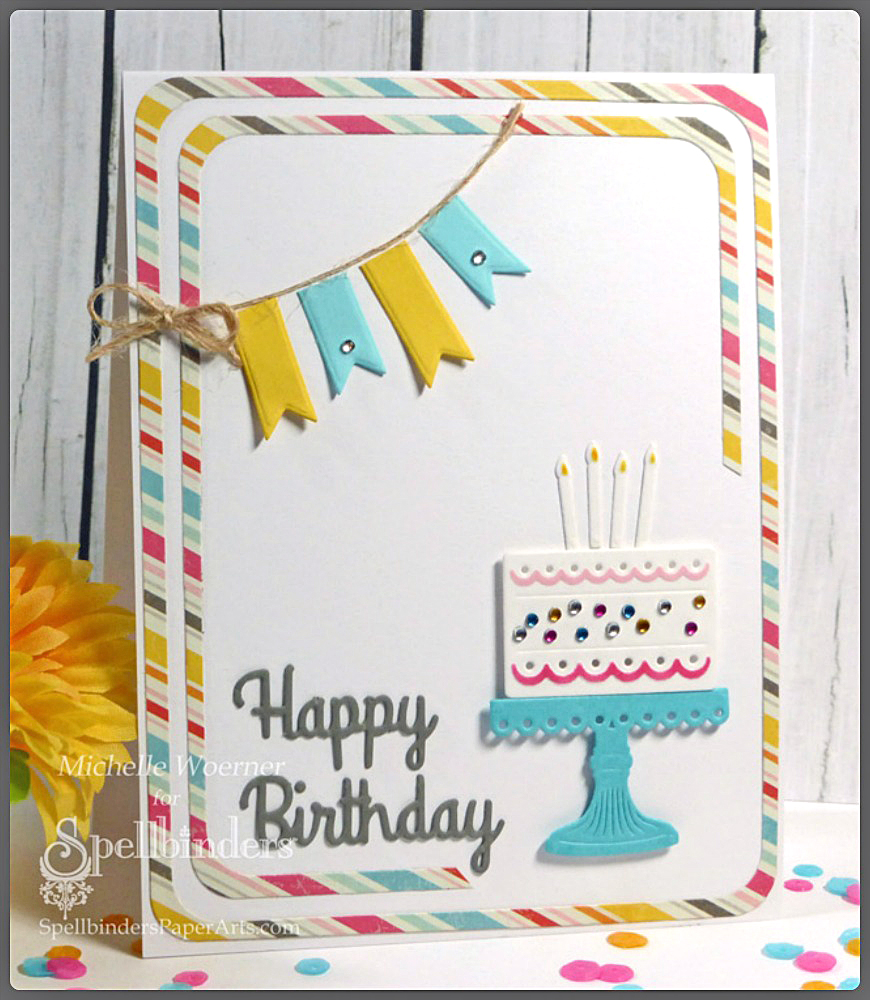
The die sets I'm working with today are Happy Birthday Cake and Sentiments One. Here's my first card.
Supply List for Happy Birthday card:
Spellbinders® Die Templates
Spellbinders® Die Templates
S2-082 Sentiments One
S2-081 Happy Birthday Cake
Here are the dies I used for the interior of my card. I wanted the cake to be a different color from the cake stand, so I carefully taped the die template to both aqua and white cardstock. I could have die cut the entire piece with both colors, but I always love a good shortcut!
 Here they are all cut out. I cut the banner into pieces to use for the accent banner on my card and you can see how the 2 pieces were cut from the cake die.


My first step was to nest the largest dies from Matting Basics A #7 and 6 (with die #1 being the smallest). That first cut made a 1/4" wide frame and a large panel.


Before I go, I wanted to show you all the new Tool 'n One! I used it to pop out the little pieces on my sentiment die (don't forget to fish out the dot for the "i" before you trash them!!) and I discovered a bonus, it also partially popped out the letters themselves. This made it easier getting the letters out of the die.


Michelle, I love this! You are always coming up with "shortcuts" and that is so helpful! I can't wait to try some of the projects during this week's journey! Thanks for sharing!
ReplyDeleteI love your cards, they are beautiful! Always such a great blog, terrific tutorials, and a bit of humor too! Wished I had thought of this April fools idea, would have loved to done that at school today!!!
ReplyDeleteBeautiful cards Michelle, I just love your ideas and how the cards come together. so bright happy and fun. I also love the wedding card idea, looks wonderful and elegant. Your work is so inspirational.
ReplyDeleteLove your cards Michelle they are so cute! And i love the cake die too, what you did with it is adorable :)
ReplyDeleteLove your cards!
ReplyDeleteWhat a great pair of cards, from casual to elegant in a few simple steps. Great job.
ReplyDeleteLove your projects.
ReplyDeleteVery cute projects. I really like the wedding card.
ReplyDeleteLove your cards, you've used the dies beautifully.
ReplyDeleteSo gorgeous! I love the dies.
ReplyDeleteStunning projects.Melanie
ReplyDeleteGreat projects Michelle. Thanks for the tips you gave. I always seem to throw the dots for 'I's' away and end up having to cut them again! Doh!
ReplyDeleteCrafty Hugs
Heather xx
Crafty Hugs
Heather xx
love your birthday card, so awesome, especially the die-cut border.
ReplyDeletetwo beautiful cards- not sure which I like best love the fun of the first one and love the goldness of the second- thanks for sharing Michelle and the inspiration
ReplyDeleteVery pretty cards
ReplyDeletebrilliant card looks so easy too
ReplyDeleteGorgeous scrapbook page, great photo too
ReplyDeleteThank you for sharing such cute cards! Can't wait to try these dies.
ReplyDeleteTwo lovely projects ,especially like the card , very pretty
ReplyDeleteLove your cards. I have no sentiment dies. After seeing your projects I know it's something I need to invest in.
ReplyDeleteYour cards are great! The first one is so fun and the second one is very classy! I love the word dies and you did a great job showing them to us!
ReplyDeleteGreat cards the birthday one is very cute! I can't wait until these are purchasable. Thank You for sharing them!
ReplyDeleteLove your cards!
ReplyDeleteSuper cards, love how versatile the cake is and your use of the frames too.
ReplyDeleteAbsolutely stunning examples great tutorial thanks for the inspiration love the alternative use of cake die for wedding cake
ReplyDeleteSuch wonderful ideas!!! Lovely work. Those cakes are incredible.
ReplyDelete<3 J
jwoolbright at gmail dot com
HerPeacefulGarden.blogspot.com
Very nice cards. I like that double framing. The sentiments are so nice.
ReplyDeleteWoe, great card!!!! Thanks for tut!!!!
ReplyDeleteLovely cards - you are very good at getting precise pieces!
ReplyDeleteBeautiful cards Michelle, love the one with with the gold...so very trendy !!
ReplyDeleteThanks for the lovely comments on my blog :)
Stunning projects. I just love the wedding card... So elegant. Love from Denmark.
ReplyDeletewhat lovely projects, I enjoyed much.
ReplyDeleteFantastic card. I love how this cake diecut can be coloured up for a fun birthday card or made into an elegant wedding card. Thank you for sharing their creation.
ReplyDeleteFabulous card and many thanks for the tutorial...Loving all the new dies.
ReplyDeleteSheila xx
Beautiful cards Michelle. Love how you did the two cakes, both great ideas. The paper you used for the birthday card frame is so pretty and
ReplyDeletefestive and the gold for the wedding cake is gorgeous.
So pretty. I love those candles and sentiments.
ReplyDeleteBeautiful cards. Thanks for the step by step instructions. I never think of doing some of these things.
ReplyDeleteTwo lovely projects, the birthday cake is going to be great for little ones birthdays, thank you for the ideas
ReplyDeleteLove the cards.
ReplyDeletecraftymom205 at yahoo dot com
Great projects - I love seeing what you do with the dies!
ReplyDeleteLove both the cards.
ReplyDeleteHello Michelle! WOW these are just amazing ... I love them all! Can't pick a favorite! But if I had to, it would probably be the first one! LOVE that colorful framing! Thanks for inspiration and fabulous tips!!
ReplyDeleteWow...beautiful....LOVE that cake, what a fun die that will be and the sentiments would come in super handy too. Great post with great samples!!!
ReplyDeleteGreat ideas, love it!
ReplyDeleteThanks for thinking outside the box with the helpful hints!!!
ReplyDeletegreat project with helpful tutorial.
ReplyDeleteThis set of dies makes it quick and easy to make lots of cards. Thanks for the nice tutorial.
ReplyDeleteGreat cards Michelle. I have never heard of gold mirror card stock but I will definitely need to find some of that - it's beautiful.
ReplyDeleteThis comment has been removed by the author.
ReplyDeleteSo many great tips for creating this card! Great photos to help make it.
DeleteThese are fabulous...I love the gold mirror card stock...it's prefect for this die too...I also love how you made your border..genius...tfs
ReplyDeleteAwesome cards! Thanks for the tutorial too!
ReplyDeleteBeautiful cards. I really need these sentiments dies.
ReplyDeleteDELICIOUS cakes and DELIGHTFUL cards!!!
ReplyDeleteTHANK YOU for sharing your tutorial and creative inspiration :)
BOTH cards are FABULOUS and I love your informative directions and shortcuts -- TFS!!!
ReplyDeletelove the new cake die. thank you for sharing
ReplyDeletewonderful projects! great creativity
ReplyDeleteLove those dies!
ReplyDeletegorgeous projects
ReplyDeleteAdore your page. The card is really cute with all the sequins in the window. Thanks for sharing!
ReplyDeleteWow, love this cake, it's beautiful! !
ReplyDeleteBoth of your cards are so beautiful. Love the cake and the words dies. TFS
ReplyDeleteThese cards are GORGEOUS! Lovely dies too.
ReplyDeleteEeeeeeee! I love these cards, Michelle! The first one is so bright and fun and happy, and the second one is so elegant and classy! It's just awesome how you can make the same dies give off two different vibes on your cards.
ReplyDeleteVery beautiful cards!! Love that cake die
ReplyDeleteBeautiful cards! Love the cake!
ReplyDeleteboth projects are lovely and the first one gives me a good idea of what to try with my card creator dies
ReplyDeleteLove both cards, all the details you put into both of them. Very nice. How did you get your tool n one already? I ordered two and we were notified it would possibly be May before we get them. Thx for sharing your work.
ReplyDeleteThank you for your great projects! I only have a few dies thinking I didn't really need them since I own a Cricut, but I can see now that I was totally wrong! I have learned how very versatile they are and I will be purchasing them ASAP! This Frenzy and all the designers have opened up a whole new way of crafting for me!
ReplyDeleteBlessings,
Melitta
Thanks for all the little extra hints -- these are always so helpful. Gotta get me one of those Tool in one's , they look so handy.
ReplyDeleteThank you for sharing your tutorial on your Great cards. I loved you using the stripe paper and making the frames. These dies are great to use in many different projects.
ReplyDeleteWhat cute cards Michele, I love that you showed how to cut more than one die at a time. I do that often, but a lot of gals don't know that quick step. Thanks for sharing your creativity with us.
ReplyDeleteHugs
Love your striped borders - a great look. Thanks for sharing your ideas!
ReplyDeleteFabulous cards. Thanks for showing the tip on die cutting with the different cardstocks.
ReplyDeleteLove the cake die.
Cheers
Trina Millin
What beautiful cards. Love the tutorials showing us shortcuts.
ReplyDeleteYour cards are Awesome!!
ReplyDeleteAbsolut awesome cards here, I really like, what you´ve done with these lovely dies.
ReplyDeleteGreat projects!
ReplyDeleteChristine
I love what you did with these dies!
ReplyDeleteAwesome cards! I really like how you used the banner on the forst card :)
ReplyDeleteI so love that cake and how versatile too! Great cards, great dies!!! Thanks you so much for sharing with us!
ReplyDeleteYour cards are awesome! Good for about any age and I thank you for sharing with us!
ReplyDeleteThese are both really cute!
ReplyDeleteBoth of your cards are fantastic! Thank you for the tips!!!
ReplyDeleteBeautiful projects!!
ReplyDeleteLove your work
ReplyDeleteFantastic cards! One is fun and the other is very elegant looking!
ReplyDeleteLove the shortcuts! Thank you. I use washi tape to hold my dies in place too... especially when cutting photos.
ReplyDeleteWhat a darling card!!
ReplyDeleteLove the cake die it is amazing. I thought I was the only one who used washi tape to hold my dies down.
ReplyDeleteThat cake is way so sweet! Love how you colored it.....great die!
ReplyDeleteGreat cards Michelle! Love the cakes!
ReplyDeleteThank you so much for the tutorials. I honestly would not have thought to use the cake for other events, thank you for showing how versatile it is.
ReplyDeleteTake care,
Diane
These cards are wonderful! Thank you so much for sharing all the details on how to make them.
ReplyDeleteGreat cards Michelle! Love the cakes!
ReplyDeleteLove the simplicity of the cards!!! Cards that you give to either female or male!!! Beautiful!!!!
ReplyDeleteLove your design
ReplyDeleteBoth cards shown here are beautiful! I love sentiments because I have terrible handwriting so I can always use simple messages like happy birthday or congratulations. Thanks for sharing your gorgeous work!
ReplyDeleteWhat a fabulous cake die! Sponging through it is a wonderful way of sugar-free frosting, ;-).
ReplyDeleteBeautiful cards! Love the tool-in-one and I've got to have that Gold Mirror Card stock!!
ReplyDeleteLove both cards and the step by step tutorial with photos is great. Many thanks Michelle x
ReplyDeleteYour cards are absolutely gorgeous!! I love how you used the dies!! Thanks for the inspiration!!
ReplyDeleteLisa F
A Mermaid's Crafts
I love designs that make use of products not necessarily how they were originally intended - really shows how versatile they are!
ReplyDeleteThanks!
Wonderful cards! love the frames, too. That cake is so darn cute, and I know that I will have to order it. Thanks for the inspiration.
ReplyDeleteLike how you showed the versatility of this die. Nice cards
ReplyDeleteGorgeous cards Michelle!!!!!! These dies are perfect for cards!!!!!!
ReplyDeleteMarcie
Fab cards! Maddy x
ReplyDeleteWhat wonderful cards, love the new dies!
ReplyDeleteCute!
ReplyDeleteI love both these cards Michelle!! Great ways to use the dies and I know I have to order the birthday cake one now!!! Beautiful!!
ReplyDeleteCute cards!
ReplyDeleteBeautiful cards, Michelle! Love that new tool, too. xxD
ReplyDeleteHi Michelle. I love both cards, it's great how you show, just by changing papers, you can get a totally different look : ) Take care.
ReplyDeleteOhhhhh I love that second one especially....very inspiring!
ReplyDeleteLaura
Wonderful tutorial! Very easy to understand and SEE! :)
ReplyDeleteThank you for sharing this and for giving us inspiration with your beautiful cards. Both cards are keepsakes!
So very pretty and the tutorial is wonderful! Thanks for sharing with me and giving me the know how so I can create a similar card!!
ReplyDeleteSuper cards! Love the new tool!
ReplyDeleteGreat cards...now you make me want this set also. My wish list keeps growing.
ReplyDeleteLove both cards, especially the wedding card. My 'must have' list needs another page! I've tried all sorts of ways to empty my dies of the tiny bits - the tool goes to top of the list!!
ReplyDeleteI love how you lined up the striped paper it's looks stunning. CUTE CUTE CUTE
ReplyDeleteWow - I just love this cake die and what you have done with it
ReplyDeleteI really love your cards, especially the striped border on the first one. Thanks for sharing.
ReplyDeletethanks for sharing such wonderful inspiration
ReplyDeleteI often try to figure out what to do with just a cake stamp?? I know you are using a die cut and not a stamp, but I love what you did with both cards. You are great inspiration. Thanks for sharing
ReplyDeleteLove the frames you created from the striped paper...I am impatiently waiting for my Tool-in-one!
ReplyDeleteThese dies are wonderful and I love the way you used them! If I don't win them, I may have to buy them! Your cards show the versatility that makes these dies a "must have."
ReplyDeleteWhat awesome projects. Thanks for the step-by-step. I just love seeing into the creative process of others.
ReplyDeleteGorgeous Michelle!! What a sweet cake die!!
ReplyDeleteThis is such a lovely set! I really can't wait to get this one - so versatile!!
ReplyDeleteI love how you customize that cake die to make a variety of cards!
ReplyDeleteThese cakes are stinkin' cute! And it looks like I need a Tool n One!
ReplyDeleteBoth of your cards are beautiful. I really like the tool for the dies. Thank you for sharing.
ReplyDeleteI just love both of your cards and especially love all the gold on the wedding card. The Spellbinders Cake Die is very versatile and that is always a good thing. I know that I will be investing in so many new dies and that awesome Tool 'n One. Thanks for sharing your beautiful ideas.
ReplyDeleteI love how you frame the bday card and adding the little bling to the cake - ADORABLE! Nice to see the 2 different takes on that die -- it is a must-have for sure!!
ReplyDeleteYou're cards are just beautiful. Love the cake dies.
ReplyDeleteLovely cards Michelle! Thank you for sharing!
ReplyDeleteYour cards are just lovely and I like that you used the cake die in two different ways. Beautiful creations!
ReplyDeleteYou did a great job of showcasing the dies. Those cakes look great and the two cards different from each other. Very nice.
ReplyDeleteAmazing cards :-)
ReplyDeleteThis is beautiful.
ReplyDeleteStunning....
ReplyDeleteTons of fun! Love the bright, cheerful design!
ReplyDeleteMichelle, wonderful cards, they are both fantastic, can't wait to get my new dies,and I am really looking forward to the new TOOL, that looks great, I bet it will be a big seller.Thanks
ReplyDeletehugs
Donna
Hi Michelle.... love the simple elegance of both cards.... loving the tool...a must have I'm thinking.
ReplyDeletex
Nice cards. Love the matting basics. A MUST have for sure!
ReplyDeleteThank you Michelle for sharing these great cards ..
ReplyDeleteAwesome card!! Love the sentiments die!!
ReplyDeleteBeautiful cards! Thanks for sharing!
ReplyDeleteTFS! Those look amazing!
ReplyDeleteBoth cards are beautifully done, I love the banner you made... thanks for the cool trick on more uses
ReplyDeleteLove the sentiments die!! I love the simplicity of these cards. Thank you so much for creating and sharing it.
ReplyDeleteBoth your cards are great and thanks for the tutorial.
ReplyDeleteThese are awesome!! Thanks for the indepth tutorial on the birthday card. The sponging really makes it extra special. That card is really adorable.
ReplyDeleteI am really looking forward to using these new word dies!
ReplyDeleteBeautiful card!!
ReplyDeleteOoh, beautiful.
ReplyDeleteFantastic looking creations made with those new Spellbinders. Love what you did with them.
ReplyDeleteAwesome cards! Those dies can help make really cute cards without too much fuss!
ReplyDeleteLovely.and beautiful
ReplyDeleteGr Elly
very fun birthday card, love how you used all the dies
ReplyDeleteGreat cards!
ReplyDeleteLove the cards, so elegant!
ReplyDeleteit's a fantastic card, so beautiful!
ReplyDeleteI loved your cards. Thank you so much for sharing the tutorial with us. hugs Carmen
ReplyDeleteLovely cards. Very interested in seeing the new tool.
ReplyDeleteBeneta
Awesome Cards,
ReplyDeleteThanks for sharing
your talents. I have
ordered the new tool
already from Spellbinders,
I can't wait till it arrives.
Love the congrats card. Awesome job!
ReplyDeleteTerrific job on the two cards! thank you for sharing your technique. -con
ReplyDeleteHello Michelle, Love your Birthday project. I am a big fan of giving them out. Love to have this to my collection. great job. tfs
ReplyDeleteOnline Jobs of Data Entry, Copy Pasting, Add Posting, Clicking, Web Surfing, Website Visiting, Article Sharing, Data Sharing, Google Business Plans, Investment Plans, Genuine earnings from home.
ReplyDeletewww.jobzcorner.com