Hi everyone! Welcome to Day 4 of the Spellbinders Paper Arts Diamond Anniversary Sneak Peek and
Giveaway. I am excited to show you one of the new
die templates being released at the
Winter 2014 Craft and Hobby Association
trade show!
The die set I'm working with today is the S5-212 Belly Band One!
S5-212Belly Band One
S5-185 2013 Snowflake Pendant
Tutorial how I made the belly bands for the bottle and gift card holder:
1. Trim cardstock to 8 1/2" x 2 1/2"
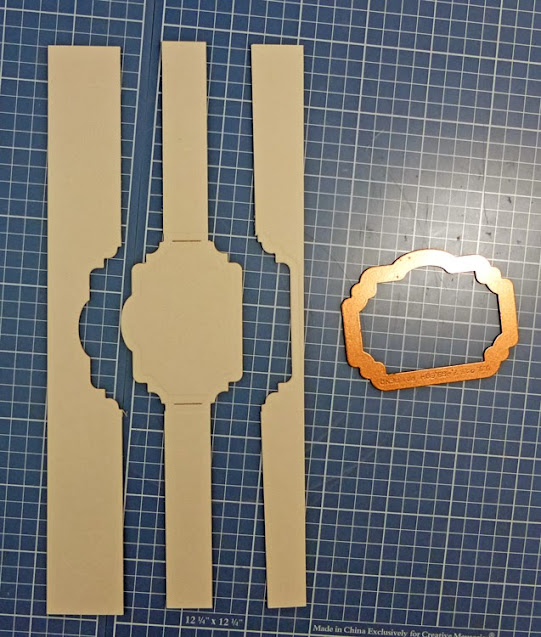
2. Tape die down with the bottom line of the die parallel to the bottom edge. For this layer, I used Belly Band Die #2 (with #1 being the smallest).
This is what it will look at once it's cut and embossed. You'll notice the left and right sides are open ended. This allows you to trim your "band" any length you want.
3. To make the band cuts, I put the cardstock in my trimmer and lined it up to the die cut lines. You could also do this step freehand or even with decorative scissors.
This is what it will look like after all four cuts are made.
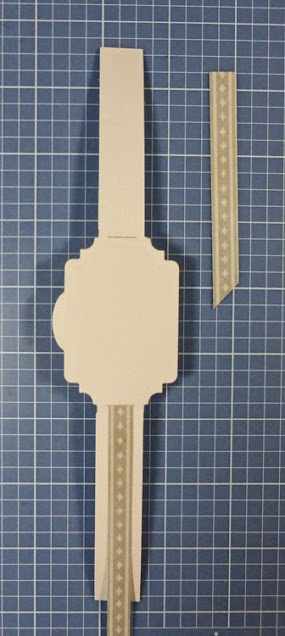
4. Next I trimmed 2 pattern paper pieces and slipped them inside the pre-cut openings. Note, you can also use ribbon as I have shown on my second project below.
5. Once the accent paper is in place, I taped the ends down in the back. Then I wrapped the entire band around my bottle/gift card holder, trimmed any excess and glued the ends together.
5. Once the accent paper is in place, I taped the ends down in the back. Then I wrapped the entire band around my bottle/gift card holder, trimmed any excess and glued the ends together.
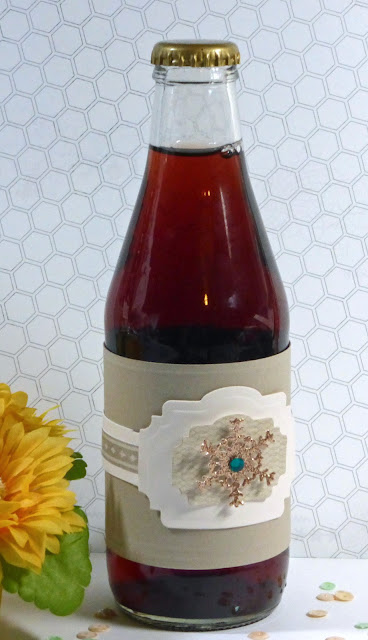
Here's a close up picture of the bottle. For the second layer, I die cut and embossed pattern paper with Die #1 and turned it into a nesting label shape instead of a band by cutting the sides.
Here's a quick tutorial on how I made the gift cardholder:
1. Trim cardstock 8 3/4" by 4 1/4"
2. Score lines at the 3" and 6" marks
3. For the diagonal opening, trim off the top right corner. I made my cut marks 1/2" in from the left at the top and 1" up from the bottom.
4. Add adhesive along the bottom and up the short side (I used 1/8" Scor-Tape). This will allow a gift card to fit inside.
Here's a picture of the ensemble with the belly band slipped off.
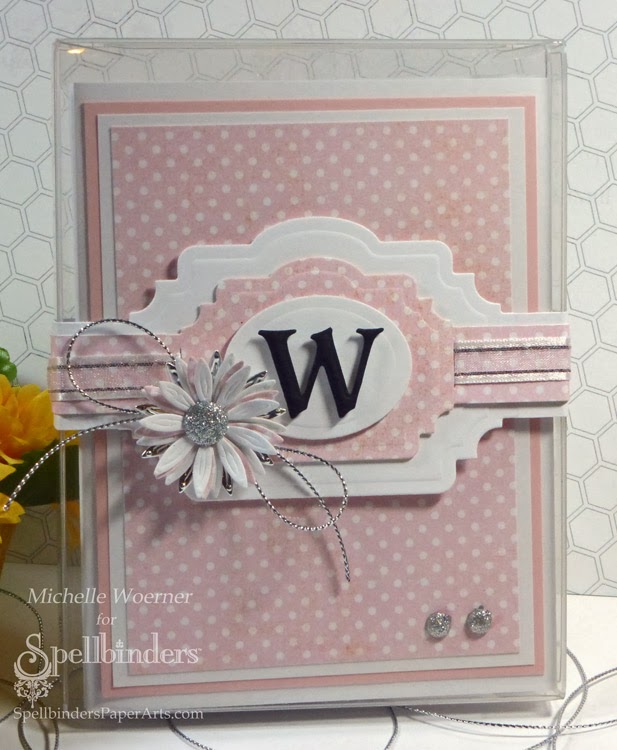
Here is another project I made with the Belly Band One die templates. I decorated a clear stationery box with two nesting bands with the top layer threaded with ribbon. I accented the layers with an oval from Classic Ovals SM, a letter from the Font One Uppercase, and flowers from the Blooms Four set.


Love your projects! What an easy way to make belly bands - just what we all need!!
ReplyDeletefabulous projects, my sweet friend! Love them all!!
ReplyDeleteOh Michelle I love your bottle and card! You make it look so simple and very unique and special! Always love your work, you are so talented! Have a great rest of your week.
ReplyDeleteWhat a fun die, Michelle! The wine belly band could also work for other things, just add length or make it smaller. I love your card as well. Happy 2014 and thanks for sharing your projects!
ReplyDeleteMichelle, These are just amazing. Love the wine bottle belly band great idea.
ReplyDeleteDeborah
fabulous!!!
ReplyDeleteWow, the acetate box is a present all by itself! Wonderful new dies!
ReplyDeleteYou're projects are just absolutely beautiful. What a great way to use the dies.
ReplyDeleteGreat job using the belly band dies.. I think that is a great addition!
ReplyDeleteI love the belly bands! I need these dies! Thank you for sharing your projects with us.
ReplyDeleteFabulous projects, when will I stop wanting the new dies?
ReplyDeleteSuch sweet projects! I love the Belly Band die set and all the possibilities. The stationery set is a terrific gift idea.
ReplyDeleteBeautiful projects!! I love the Belly Bands...something I need to make for my handmade candles!
ReplyDeleteoh so beautful Michelle! love this die so much!
ReplyDeletevery lovely projects. Love the belly bands. Thank you for the tutorial as well
ReplyDeleteFabulous Michelle! I love all of your projects, beautifully done.
ReplyDeleteAll 3 projects here are gorgeous Michelle, and you did an awesome job with these gorgeous dies here. I already have a couple more ideas, how these dies would work perfectly for as well.
ReplyDeleteWhat a great idea. I love how the set coordinates. This could be very versatile for romantic occasions, New Year's Eve, Weddings--- very nice.
ReplyDeleteAll my friends are going to be getting some pretty spiffy wine bottles this year , thanks to Michelle. Great idea and yet so simple to make . Thanks so much for your time and talents and allowing us a chance to win.
ReplyDeleteOh what a BEAUTIFUL BELLY BAND on your bottle Michelle!!! LOVE your other BEAUTIFUL projects too!!!
ReplyDeleteThese are going to be very handy dandy dies to have in every crafty stash!!!
THANK YOU for introducing us to Belly Band One in such a delightful way and for sharing your tutorial too :)
what a great idea and I love your projects- such a simple way to add some class- thanks for the inspiration and sharing
ReplyDeleteA fun die. Great ideas.
ReplyDeleteHi Michelle. I love the wonderful projects you have made with the new Spellbinders belly band! Take care.
ReplyDeleteLove your projects Michelle!! What a cool set of dies, and your tutorial makes it look so easy!!
ReplyDeleteYour projects are beautiful, Michelle. I love the belly band dies. It is so nice to see such a wide variety of uses for them. I would love to own them. :)
ReplyDeleteYou're projects are lovely and absolutely beautiful. What a great way to use the dies.
ReplyDeleteGorgeous creations. I love this idea. I have been madly bottled my summer produce. This would be great to create handmade labels
ReplyDeleteOMG I am loving your creations and the new Belly Band 1. That is a must have die.
ReplyDeletestunning what you have done with these dies thanks for sharing
ReplyDeleteYay, finally they created a die for making belly bands.. woohoo .. and what beautiful and versatle ways to showcase this new die Michelle, your projects are FAB-ulous!!
ReplyDeleteThis is a very interesting die. Can see many uses for this. Your projects are lovely.
ReplyDeleteGreat Projects.
ReplyDeleteLove, love, LOVE this new belly band die!!
ReplyDeleteLove it, the bottle wrap is so very cool. I love your projects they seem like they were really fun to create. Thank you for sharing. I really love the card.
ReplyDeleteGreat projects - the belly band and bottle label in the first one make the items look so much more appealing and I love the second project - very elegant
ReplyDeleteFabulous work! Love the belly bands!
ReplyDeleteLove the belly bands! Beautiful projects!
ReplyDeleteI love your projects!
ReplyDeletevery cool idea, cutting it with the trimmer is a good idea, sure to be straight, great projects!
ReplyDeleteWhat cute ideas you have with the new die. Love the pink card esp. TFS
ReplyDeleteMichelle, EVERYTHING you create is a masterpiece! So in awe of your talent!
ReplyDeleteYour creations are wonderful!
ReplyDeleteFABULOUS TUTORIAL & PROJECTS!!!!!!! :) I LOOOOOOVE the look of this DIE!!! It's calling me!!! AND has a feel of VINTAGE!!!!!!!!!! :) LOOOOOOOOOOOOVE IT!!!!!!!;)
ReplyDeleteLove your cool ideas. Great tutorial. Thank you for sharing.
ReplyDeleteCute projects! Thanks for sharing :)
ReplyDeleteLovely projects!
ReplyDeletevery cute little projects.. love the fold over green card with thepocket inside.. Very nice work, and a great use of this fun die!
ReplyDeleteWhat beautiful projects & great tutorial.
ReplyDeleteBeautiful projects!
ReplyDeleteThanks for sharing!
Love the bottle band and the easy-to-follow tutorial.
ReplyDeleteAwesome set of dies. Fab projects & ideas.
ReplyDeleteYour projects are great! I can really see a lot of uses for this die, more than I originally thought. Thanks for the inspiration. Now I just need to win the die!!
ReplyDeleteThank you for your great projects
ReplyDeleteLovely projects & thank you for showing us how you created them.
ReplyDeleteAbsolutely gorgeous creations! Love what you did with the belly band on both the card and the gift bottle.
ReplyDeleteGorgeous projects. This die will be so useful and would make a fab adornment on the front of a card or the corner of a layout.
ReplyDeleteTFS
Cheers
Trina
Great projects Michelle... I think this belly band die will become a well used favourite. tfs
ReplyDeleteYour creations are amazing. I love them! Hugs! xx
ReplyDeleteThank you for sharing your projects with us. New die is delightful
ReplyDeleteLovely projects. I love the look of adding belly bands to almost anything. TFS Jess
ReplyDeleteLOVELOVELOVE your card and bottle belly band!!! Great ways to use this die and the tutorial is awesome!! TFS!
ReplyDeleteThat is so neat....I love this belly band. What an awesome idea and thank you so much for the tutorial and sharing it with us!!!!
ReplyDeleteAbsolutely fabulous Michelle!!! I love the bellyband too...because of course I ADORE the snowflake!!!
ReplyDeleteThe belly bands are awesome. I wil have to dig out my fancy ribbons to try to give the die cuts justice. Love what you did on the bottle and the flat edge, totally unique
ReplyDeleteLove the belly bands. Thanks for your tutorial. Wonderful projects.
ReplyDeleteits a fantastic project, love it!
ReplyDeleteWhat fun projects, love that belly bands!!!
ReplyDeleteGreat project. Thanks for sharing tutorial too.
ReplyDeleteFun tutorial for the belly bands and gift card, Great projects.
ReplyDeleteThanks for the tips. I enjoyed the project.
ReplyDeleteBeautiful cards, and love the gate fold! This new die is very unique, and I like that it makes a great bottle/gift tag as well! Thanks for sharing your inspiration with us!
ReplyDeleteNicely done Michelle...both projects are sooooo useful - thanks for the tutorial!
ReplyDeleteJan
What creative uses for that band! I love the idea of putting it on drink bottles, maybe for picnics. Thank you for the inspiration!
ReplyDeleteCreativity is stirring in my head for this belly band die -- what a great addition to the fabulous Spellbinders' line -- TFS your creativity with us today -- LOVE it & MUST have it!!! ;~)
ReplyDeleteSimply beautiful projects Michelle!
ReplyDeleteTrès beaux projets, Bravo!
ReplyDeleteReally great projects!! Love the gift card holder!
ReplyDeleteExcellent tutorial thanks for sharing and thanks for the awesome ideas.
ReplyDeleteThese are just awesome for labels. Beautiful creations. Thanks for the sneak peeks.
ReplyDeleteI love the idea of the belly band. Thanks for the inspiration and for sharibg your ideas.
ReplyDeletelove your projects i think these dies will need to find there way into my shopping basket, ......
ReplyDeleteLovely projects, loving these new dies!
ReplyDeleteTFS
Have a wonderful day!
Beautiful projects. I really love the pink and white card.
ReplyDeleteVery handy die to have for sure. Nice job with the instructions of how you did it.
ReplyDeleteLove this. So fun. Your pink card is gorgeous!
ReplyDeleteI love your unique projects! Thanks for showing us how you made them. That card is beautiful.
ReplyDeleteYour projects are just wonderful.
ReplyDeleteOMG, just LOVE this and all this fantastic projects...
ReplyDeletehugs
Love this! Thanks for sharing.
ReplyDeleteEsp love the pink card with the belly band!!
ReplyDelete<3 J
jwoolbright at gmail dot com
Wow! You have helped me so much with your tutorial of these great new dies from Spellbinders! Pinned http://www.pinterest.com/pin/118641771407939220/
ReplyDeleteunder new CHA releases
Gorgeous projects Michelle!! Your designs are always so fresh and fabulous! :)
ReplyDeleteloved all your projects but particularly the last one with layering and ribbon. beautiful presentation.
ReplyDeleteBeautiful projects! I like the shape and versatility of this one! Layering it on the card with ribbons is very pretty! Thank You for sharing them w/ us!
ReplyDeleteBeautiful projects! I like the shape and versatility of this one! Layering it on the card with ribbons is very pretty! Thank You for sharing them w/ us!
ReplyDeleteThe "belly band" looks really pretty on the cards, too!
ReplyDeleteNoreen
Crafty Journal
Beautiful creations! Thanks for sharing!
ReplyDeleteSuper Cute projects!
ReplyDeleteWhat a great idea! Thanks so much for the step by step instructions.
ReplyDeleteFabulous ideas Michelle for using these dies!!! I love those personal touches when gift giving.
ReplyDeleteMarcie
The gift card ensemble is so cute. What a great gift idea. The stationary box is adorable.
ReplyDeleteGorgeous projects!!!!!! Thank you for sharing how versatile and beautiful the new dies can be!!!
ReplyDeleteThe cards you made are just beautiful! I like the belly bands and think they are something I could definitely find a use for, now that I've seen what you have done with them!
ReplyDeleteI also meant to tell you I love the name of your blog...very clever!
ReplyDeleteThis new die series is a must have! Very versatile as shown in your samples and tutorial. thanks
ReplyDeleteSo beautiful, such a creative display of the dies. Love each and thanks for the tutorial.
ReplyDeleteLove the new dies and the belly band ones will be very popular based on your tutorial and samples.
ReplyDeleteYour projects are great! I like the versatility of this die.
ReplyDeleteAwesome projects!! I have just started collecting the Card Creator series!! This would be an awesome edition to my collection!
ReplyDeleteLovely gift set!!! Thanks for sharing!
ReplyDeleteThese are so useful. I love that you can make them any size you want. Thanks for the inspiration.
ReplyDeleteBeautiful projects Michelle!
ReplyDeleteLove what you did with the Belly Band Set of dies. Your creativity is shown with your different projects using them. Who wouldn't love receiving the bottle or the gift card set with the belly band dies. Thanks for all your creative ideas!!
ReplyDeleteLove what you did with the Belly Band Set of dies. Your creativity is shown with your different projects using them. Who wouldn't love receiving the bottle or the gift card set with the belly band dies. Thanks for all your creative ideas!!
ReplyDeleteBeautiful projects! Love that the die has open ends...so smart! Thanks for the inspiration!
ReplyDeleteGreat projects, love the tutorial as well. thanks for sharing!
ReplyDeleteGreat projects! Thanks heaps for sharing *hugs* Sarah
ReplyDeleteInteresting die and really great looking projects.
ReplyDeleteWow what a clever idea! Your projects are stunning! Susan x
ReplyDeleteGreat project.
ReplyDeleteThanks for the tutorial.
Gr Elly
Awesome die. Love what you did with it. Thanks for the tutorial, xo Carmen
ReplyDeleteVery pretty and thanks for the ideas and tutorial, this is great
ReplyDeleteGreat job on your tutorial and use of these beautiful dies too, Michelle!
ReplyDeleteWow! Gorgeous gift idea. Thanks for tutorial. And Pink card just so lovely soft and elegant.
ReplyDeletethanks for sharing.
Hugs Nataliya
I love how you used that belly band for a bottle and also for a card. Makes it very versatile then.
ReplyDeleteLove these labels, and love the easy to follow tutorial!
ReplyDeleteLove the idea of the belly band! Looks awesome and the layers are fabulous.
ReplyDeleteLove the belly band and card set - great gift together.
ReplyDeleteYour second card is lovely too - love how you used
the Spellbinders dies on all the projects.
Wonderful cards! Love these new dies!
ReplyDeleteTotally in LOVE with your card! The belly band has always been my favorite add on and now with this die, EASY PEASY!
ReplyDeleteLoving your style! The belly band and gift card holder are fabulous. I must have them.
ReplyDeleteI love how you made this label to fit around any item really, I gotta try that now. Thanks for inspiration. Blessings
ReplyDelete